DIY magic carpet cat hammock

I made a cosy  magic carpet hammock for our cat Ananas, right under our coffee table!

He was hesitant to crawl in on the first day, but now it’s definitely his go-to cosy place. Even when we have guests over, he loves sitting at the center of the group, yet sheltered underneath the table.

ananas-hammock-result

How to make your own DIY magic carpet cat hammock

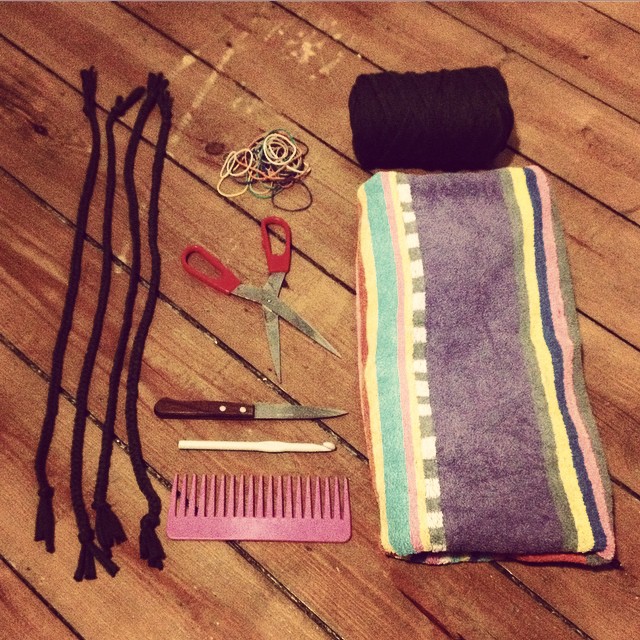
ananas-hammock-ingredients

Supplies
  • an old towel you can fold in half or into a third (like I did), make sure you use one that will look ok in your living room if you plan on hanging it in plain sight
  • some zpagetti yarn or other yarn that is strong enough to hold the whole thing (including your cat) up
  • a crochet hook
  • a pair of scissors (a knife is optional)
  • a big comb for making the tassels, but you could just as easily use your hands
  • elastic bands for tieing the tassels
  • a coffee table you can hang the hammock from
  • if you can’t attach the hammock to something underneath the table, you will have to put 4 sufficiently strong hooks into the bottom of your table or into the sides of its legs
Directions

Fold your towel and lay it out underneath your table. Make sure each corner of the folded towel is about 10 cm away from its closest table leg. If necessary, fold your towel differently or consider using a different towel. You could also cut off a strip of towel, but I wouldn’t recommend it, as the cut edge might fray when you wash your hammock or when the loose strings meet your cat’s claws.
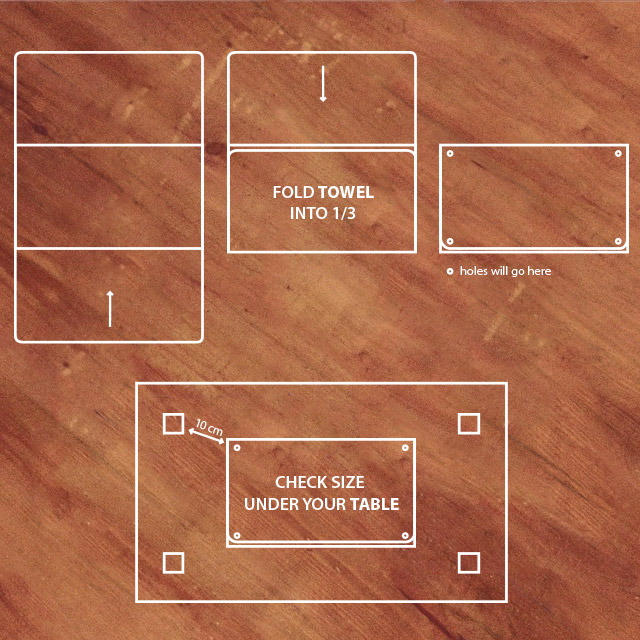
ananas-hammock-fold
Once you’ve found the right ‘fold’, put holes through the corners of your folded towel using your knife or your scissors. Make sure to stay at least 3cm away from the edges of your folded towel.

Now, crochet through the holes to strengthen the corners of your hammock. I used this video tutorial to freshen up on my (limited) crocheting skills. I used ten slip stitches on each corner. Make sure they are tight enough not to show the towel through the crochet.
Leave 10cm on each end of the zpagetti to tie together and use to hang the tassels from.

ananas-hammock-tassels
The tassels underneath give the hammock a magic carpet look. You could make the hammock without them if you feel like you don’t need it to be as bohemian.
I used a big toothed-comb and wound the zpagetti around about 5 and a half times at the length I had in mind. Then I tied one side of the wound up yarn to the loose ends of the crocheted corners and cut open the other side. I didn’t use zpaghetti to bind the tassels together and went for yellow rubber bands instead. Using yarn might have looked a bit sleeker, but I figured it wouldn’t be as cat proof or as colorful.

For tieing the hammock to the table, make 4 braids of yarn, each about 60cm long, with knots on the ends.

Wrestle the braids through the stitches of the crocheted corners, on the opposite side of the tassels.

ananas-hammock-braid
If there’s nothing underneath the table to tie your hammock to, attach 4 sturdy hooks to it.

Hang the hammock underneath your coffee table using square knots and you are done!

ananas-hammock-knot
To attract the interest of your cat, you might want to throw some toys or treats into the hammock, but make sure not to force him into it (confession – I tried, did not work). Ananas wasn’t that interested in the hammock on the first day, but we suddenly noticed him balled up in his hammock when we were watching television on the next *aawwws all over.

Enjoy your cat hammock, lots of love!

Pinterest image ^_^

ananas-hammock-pinterest

NYE and no interwebs

First and foremost:
All the best to you and yours in this brand new year!

Also:
We’ve moved into the apartment!

Two weeks and three days ago to be exact. And it was quite the busy day with  parents, siblings and housemates helping out, driving back and forth with two family cars, loading and unloading and even picking up some online-bought second hand furniture in the outskirts of Brussels.
All of that with Tim’s broken elbow, lots of stairs and traffic jam galore. Our knackered parents drove back home at 11.30PM, leaving us with furniture and boxes all over the floor, but not before making sure the biggest pieces  had already been properly set up. Like the bed. That was awesome. So proud. So sleepy.

On moving day, we got ourselves a new second-hand Belgian designer sideboard which was near-impossible to fit into my father’s car and had turned out to be enormously heavy. But it now looks oh so b-e-a-u-tiful opposite the kitchen .
We found out that the corner-cabinets we spotted online (also second-hand) are almost an exact match for Tim’s beautiful mid-century modern (hand crafted way back when near our hometowns) cabinets. The wood of the corner piece is a bit lighter and instead of a base board, like the other ones, it has 4 pretty legs. Apart from that, the handles and details turned out to be matching exactly – bliss*.

The dining room table we had our eye on was quite damaged (which was not mentioned in the advert, nor visible in the pictures – not cool  bros), so we passed up on that one, which is a bit of a pity for the wasted time, but not spending that much money on a damaged table was certainly for the best.
By consequence and necessity, my desk is moonlighting in the kitchen with a couple of tip-up seats. It doesn’t seem to mind ^_^.

Since the move we haven’t had a proper internet connection – hence this late post, but that’s supposed to get sorted this Thursday (and not on the 29th as was planned – grmblgrdamnyouinternetprovider).

Ooh! We already had our first little houseparty on NYE! And the first reactions to the place were very positive – so yay! More prouds! I made some fresh hummus and guacamole and all night long we ate and drank it up cosily/sillily –  hope you too had a great start of 2015!

*Never you mind that chipped nail polish! I was slaving in the kitchen and making the place look great all day, so myeah!
(also – that’s the Eames rocking chair in the back!)

Cheers babes and hunks, much love.

My floor plan in 7 steps

As I mentioned previously, I love drawing out plans, whether I’m reorganizing my current living area or, as in this case, when I’m moving into a brand new place.

In this post, I would like to share the way I created the floor plan of our new apartment. The whole ordeal took me three hours or so, spread over two days.

IMG_2431

what I used:

  • measurements of the new apartment (got them from the sweethearts that currently live there)
  • pictures to fill in the blanks (I used the ones in the online ad)
  • gridded paper (mine has a 5mm grid, which came in very handy)
  • a mechanical pencil and an eraser
  • a ballpoint or felt pen and (just to be sure – ) some liquid paper
  • a ruler
  • colored pencils/ markers
  • a tape measure for your furniture
  • scissors (or a cutter knife if you’re up for it)
  • painters tape

 step 1 – sketching

Before starting on the final plan, I puzzled the apartment together. I kind of remembered the layout of the place, but a detailed drawing tends to take a bit more information. For my first drafts I used the measurements, the pictures in the advert AND a top view of the place (satellite picture) which you can easily find online. That top view helped me figure out how far the bedroom sticks out of the back of the building. Thought to myself that that was a pret-ty clever thing to do…
I included the way the doors opened, the non-movable kitchen- and bathroom furniture and appliances and also made sure to include the heating, because that’s something important to take into account when arranging your furniture.

I kept scaling easy by using the length of two adjoining squares (= 1cm) on the paper as 1m in real size.

I sketched out 3 versions, each one a bit more realistic and complete than the last. When I figured out how every room attached to the next, I moved on to…

step 2 – positioning the plan on the paper

Which is why step 1 was so important before moving on to your final drawing. If you know the dimensions of the entire thing, you can center it on the page and decide on the scale you will use. Do this in pencil, so there’s no permanent mistakes.

I doubled the scale for this one (so 2cm = 1m), so the furniture I put in later wouldn’t turn out too tiny to cut out.

For the kitchen and bathroom, I used some symbols used in architectural floor plans to indicate the location of appliances like my refrigerator, dishwasher etc. and other non-moveable things like sinks and the bathtub. you can easily find them with a quick online search for ‘symbols for floor plans’.

step 3 – ink when ready

When you have the whole thing on there in pencil, go over your distances, pictures and other aids again. Have you included all of the windows? Do you remember which way the doors open? Did you get all the heating in there?

If so, put the whole thing in ink with a ballpoint pen or a felt pen, using your ruler to keep the lines straight. Let dry(!) and carefully erase the pencil lines.

step 4 –  add some flavor

I chose to put some color on the floors. This made it easy for myself to visualize the place, and it created a bit more contrast between the floors and the furniture, which I kept black and white. The fact that I used colored pencils turned out to be a good idea since painters tape tends to stick less to paper that’s been colored, so the risk of tearing up your plan when rearranging the furniture is reduced.

step 5 –  take measurements of your furniture

Take out your tape measure and start writing the dimensions of the furniture down. Don’t forget your carpets!

step 6 – cut out and customize

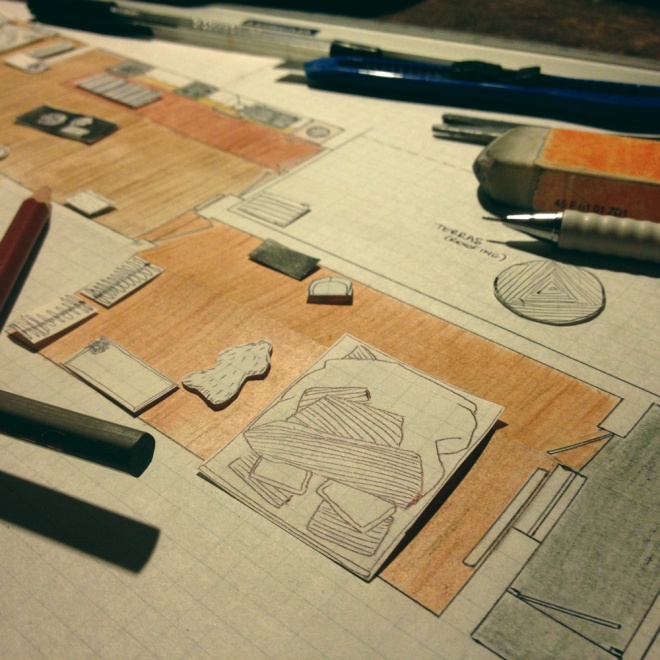
This is a pretty delicate task. Some of the furniture, like a couple of side tables, was kind of small, so it took some patience to cut out the pieces and add detail in pen. To be able to recognize each shape, I wrote a description of each piece of furniture on it’s bottom in pencil. When drawing on the detail, I added some plants on some pieces, to easily recognize them.

* I  went cut first, then draw, but in retrospect, maybe I should have reversed that order.

To finish the task, I added  masking tape to the bottom of each piece of miniature furniture, so that I could stick them gently onto my floor plan. Make sure not to stick ’em on too enthusiastically though, make sure you’ll be able to try out some different arrangements.

IMG_2435

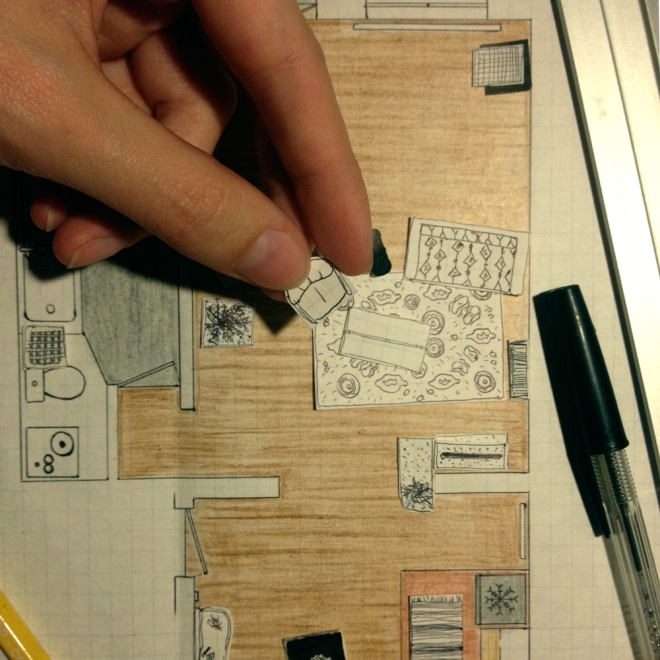
step 7 –  play around with it!

Victory dance for your awesome detailed floor plan! Arrange! Rearrange! Get fantasizing about what the place will look like, imagine what other pieces of furniture would go well with your brand new shared space, think up what kind materials, paints and wallpapers you would love to use! Do you think you need an extra rug to tie the place together? Are there things that you might not want to take and could consider selling for some extra cash in your decorating budget? This is your chance to go wild and visualize baby!

This little project scratched my itch to get crackin’ on the place before we actually move in, I hope making your own might do the same for you!

IMG_2434

Within 24 hours stars aligned

– a long introductory read ^_^

The way I’ve been living

Ever since leaving my parents’ house at the age of 19, back in 2007, I’ve been sharing houses with people. Five different houses over the past eight years, all of them different, all of them great in their own way.
Living in a house together not only keeps costs low, it also keeps your surroundings interesting. You never have to feel alone, but can choose to retreat to your own space whenever you feel like it. Plus, having different personalities in one house is a great way to keep you grounded and self aware. It stretches your social skills (there’s been trial and error) and teaches you about how to communicate and compromise. A lot depends on the people you live with, sometimes you clash and things can get tense. But most of the time and with good intentions, sharing a house is the way I thought I wanted to live for practically the rest of my life.

So a couple of months ago when Tim pointed out to me that (ever since I got a cat, a very adorable one) we spent almost no time at his place anymore, I started thinking about him moving in to the house I share with three other people. We could live together without the huge commitment of getting our own place, and he wouldn’t be throwing money away paying rent for a place he stayed at for one, maybe two nights per week.

Without wanting to get too mooshy here, I have to point out that I’d never before even considered sharing my personal space with a boyfriend. So yeah, uhm that was a huge mental step for me, FYI in cursive.

I mentioned the idea of him moving in to my housemates and they had some other points for me to consider. A couple moving in to a shared house could throw off the over all balance of the place. Even if you don’t intend on hogging the couch four yourselves or having romantic dinners in the common dining area, situations occur in which a couple ‘claims’ space without purposely wanting the other occupants to feel like a third wheel.
On my oh-my-god-I-actually-want-to-live-with-this-guy cloud *hearts in the eyes*, I hadn’t considered their concerns yet (bad housemate behavior on my part). But I thought they made a great point and I’m sure that had I still been single, I wouldn’t have wanted a couple moving in like it wasn’t a thing.
So we had a house meeting and eventually decided to give the couple in the house-situation a shot. A two-month trial period as it were, with an honest evaluation planned at the end of January. If it didn’t feel right to everybody, he could still move back out, right?
When that question was asked, I felt a small cringe in my chest.
He could move back out?
With me still living here?
Apart from that being a bad decision financially, I was suddenly so sure that I didn’t want to live anywhere without him anymore *again with the hearts*. I realized on the spot that I was finally at the point where I didn’t mind giving up my personal space anymore, I wanted to share it. I hadn’t considered having to live apart again and the thought of it made me feel icky (for lack of a better descriptive term). So I told my housemates, who were just as surprised about my decisiveness as I was. I wanted to live with Tim, in the house if it worked out, if not, elsewhere.

So whereto?

As I said, sharing a house keeps you grounded, so re-grounded by our meeting I told Tim about the trial period plan.
We were laying in bed staring at the ceiling and I could feel he was frustrated by the idea of moving in and maybe having to move back out after only a short while. On my side, I felt a bit hesitant about telling him about my epiphany earlier, during the meeting. Right off the bat we’ve been kind of careful about ‘claiming’ each other too strongly in our relationship. We were both very happy being single and uncommitted together before things took the crazy turns that lead us to being together.
So telling him that I didn’t want to live without him anymore felt like a bit of a bombardment, since I could only suspect him to feel the way I did. I had just realized my commitment to him a couple of hours before, so I assumed he would have to warm up to any new information.

After a bit more ceiling-staring I finally mentioned the possibility to maybe look for an apartment together… Just to make sure we could keep living together, no matter the turnout of the trial. Like me before, he hadn’t thought about that yet, but it seemed like a good idea to make sure we wouldn’t have to find something at the last minute come February.

The next day, he was just as surprised as I was about how good the idea of an apartment together felt to him. As it was a pretty slow day at work, we sent each other links to a couple of interesting apartment adverts. One of them was actually located on the street I used to live on when we first met. Since I really miss living there and the apartment looked great, I asked Tim whether we should send an e-mail, just in case. The just in case turned into an appointment with the current occupants of the place. They instantly replied to my e-mail, inviting us to come and have a look that same night.

So after work, feeling excited, hesitant and curious at the same time, we rang their bell and got invited into a beautiful, clean apartment. High ceilings, tons of space, huge windows, a fully equipped open kitchen and beautiful hardwood floors, and not too pricey, a perfect fit. We drank a cup of tea and talked about the place, the neighborhood I missed so much, about why they were leaving and whether they would consider us. I looked aside at Tim, at his excited face. My face was also expressing mountains of extreme excitement. They would love to propose us to the landlord.

We left there to go see a dance performance, already glowing with the idea that we might get our own place by the end of December. (BY THE END OF DECEMBER o_o) On the bike ride home, with celebratory french fries in his backpack, we couldn’t stop sneaking peaks at each other and fantasize about how wonderful it would be to live a bit closer to the city center, in a place of our own. We ate on the bed in my room that night, which confused the cat a little, and I loved that moment of pure bliss in which I could feel that we both wanted this more and more each minute. The night before, we had been staring at the ceiling…